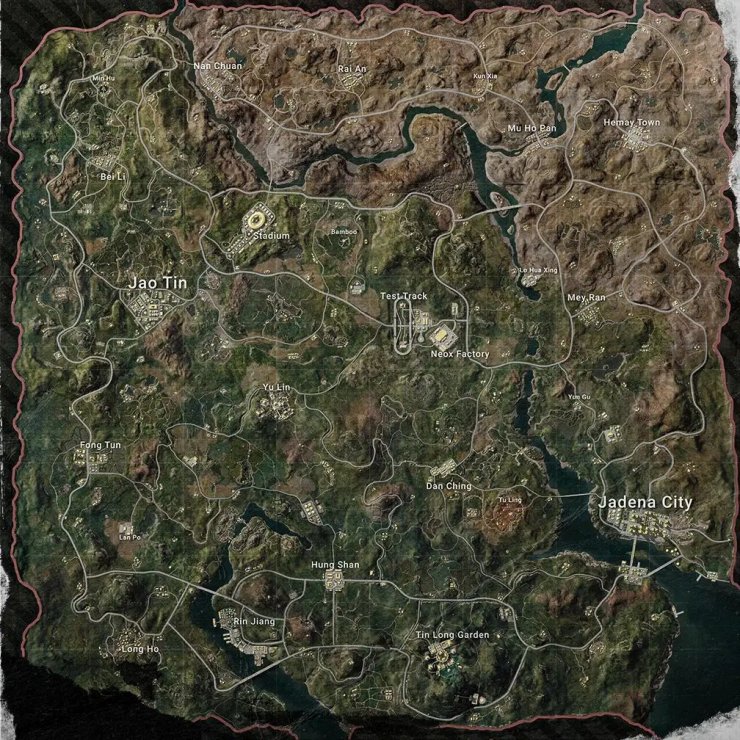
The Rondo map, introduced in the 3.7 update for PUBG Mobile and BGMI, is the largest map in the game, spanning an 8x8 km area that supports up to 100 players.
In this article, Gurugamer is going to go into every area on the map to showcase the best strategy to win.
Key Locations and Hot Drops
Rondo features over 20 named locations, each with unique layouts suited for different playstyles. Here's a breakdown of the most notable ones:
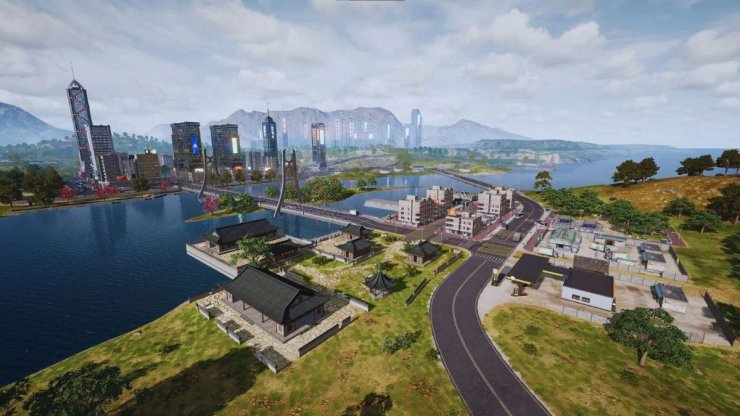
- Jadena City (Chaos Capital): A massive urban hot drop with skyscrapers, paved streets, and escalators for quick vertical movement. It's ideal for aggressive squads due to high player traffic and intense close-quarters battles. The stadium within it is a prime spot for early fights and good loot, but watch for snipers on rooftops.
- NEOX Factory: Located near the map's center, this industrial area includes an automobile factory and a test track. It's a popular hot drop for vehicle spawns (like the new Blanc car) and central positioning, allowing easy rotations. Be cautious of campers in higher stories and unfinished vehicles used as hiding spots.
- Jao Tin: A key area with a theater offering vantage points for spotting enemies. It's great for decent loot and ziplines for quick escapes. Land here for a balanced start with moderate risk.
- Low Hine (Big Shop) / Renang & Low H Shine (Premium Stores): High-loot zones guarded by AI NPCs. Low Hine attracts competitive players for top-tier gear, while premium stores offer airdrop-level items like MG3s and Level 3 armor after defeating guards.
- Rin Jiang: A scenic riverside village with restaurants and water access. It's good for initial looting before rotating via boats or rivers.
- Yu Lin: A dense forest area with thick vegetation, perfect for stealthy play. Visibility is low, favoring ambushes and close-range fights.
- Test Track: Adjacent to NEOX Factory, it's suitable for low-profile looting and vehicle testing.
Other notable spots include ancient temples for podium events (where winning squads are displayed) and basic stores scattered around for trading attachments.
Loot Spots
Loot on Rondo is abundant but location-dependent. Focus on these for the best gear:
- High-Tier Hot Drops: Jadena City's skyscrapers and stadium yield decent weapons and attachments on every floor. Premium stores in Renang and Low H Shine provide god-tier loot (e.g., MG3, JS9, Level 3 gear) after clearing AI guards—defeat them tactically with your squad for disguises and extra items.
- Vehicle and Utility Loot: NEOX Factory and Test Track spawn vehicles like the Blanc for quick rotations. Sell gold bars from safes or attachments at basic stores to buy supplies, vehicles, or Supply Blind Boxes.
- Stealthy Loot Areas: Yu Lin and Rin Jiang offer solid mid-tier loot in low-visibility environments. Jao Tin's theater has decent spawns with observational advantages.
Pro Tip: Use the innovative shop system—basic stores for quick trades, premium for high-risk/high-reward loot guarded by accurate AI.
Unique Features and Mechanics
Rondo introduces several game-changing elements:
- Escalators: In urban areas like Jadena City, use them for fast repositioning, ambushes, or escaping chases. They're great for vertical mobility and catching enemies off-guard.
- EMP Zones: These temporary areas disable electronic scopes, vehicles, stores, and other tech (no physical damage). They appear after a notification and last until the third Blue Zone. Plan escapes and switch to iron sights if caught inside.
- Destructible Terrain: Use pickaxes to break bamboo, wooden walls, or obstacles for new paths, escapes, or attack angles.
- New Items: Stun Gun for freezing enemies, Signal Jammer Backpack for extended Blue Zone survival, Emergency Cover Flare for instant barricades, Battle Ready Kit for full heals, and JS9 SMG for close-range dominance.
Strategies

- Early Game: Opt for hot drops like Jadena City or NEOX Factory for loot and vehicles, but coordinate with your squad—split at stadiums (one team on field, one on bleachers) to cover more ground safely. Avoid passive play; aggression secures better gear early.
- Mid Game Rotations: Use central spots like NEOX for quick vehicle grabs to rotate. In forests like Yu Lin, stay stealthy with low visibility. Monitor EMP zones on the map and adapt by going on foot if needed.
- Combat: Favor SMGs for close-range due to vegetation. In urban fights, leverage escalators and ziplines. Destroy terrain to create openings and use stun guns for squad advantages.
- Shop Utilization: Trade at basic stores for essentials; raid premium stores with a full squad for elite loot. Steal NPC disguises to blend in.
Overall, prioritize aggression over camping—hot drops lead to podium glory and better positioning.
Tips and Tricks
- Always carry an SMG like the JS9 for frequent close-quarters encounters.
- Practice recoil control and decision-making in training mode to handle Rondo's chaos.
- In EMP zones, exploit enemy panic—attack while they're disoriented and use iron sights.
- Deploy emergency covers in open areas but avoid standing under them. Save Battle Ready Kits for final circles.
- Land near basic stores to optimize inventory early. In premium stores, engage AI from cover or with grenades.
- Use cliffs and vegetation for concealment, especially in late game.
- For squads, communicate rotations and split looting duties to minimize exposure.
Final Circle Advice
Final circles often land in open spaces between locations, with cliffs acting like natural high grounds. Hug the Blue Zone edge for safety or claim cliffs for aggressive engagements. Use signal jammers for extended survival, deploy covers for protection, and stay adaptable amid chaos from EMPs and destructible elements. Aggression pays off—control key terrain early to secure the Chicken Dinner.


Comments