Even though Digimon Story: Time Stranger puts a big emphasis on its story about Digimon and humans getting along, a key part of playing is running a farm. The Digifarm lets your digital monsters mess around with a punching bag or dance on their own. As they do these activities, the Digimon actually build up strength and get set for Digivolve.
This guide covers everything you need to know about running the farm and upgrading it in Digimon Story: Time Stranger.
The farm in Digimon Story: Time Stranger, explained
The Digifarm is a classic feature in Digimon games, and it stays pretty much the same in Time Stranger. It's a dedicated area where you can stick up to 30 Digimon to train them for better stats or tweak their personalities, feed them to boost bonds, or just let them wander. Every Digimon on the farm picks up the same EXP as those in your main box.
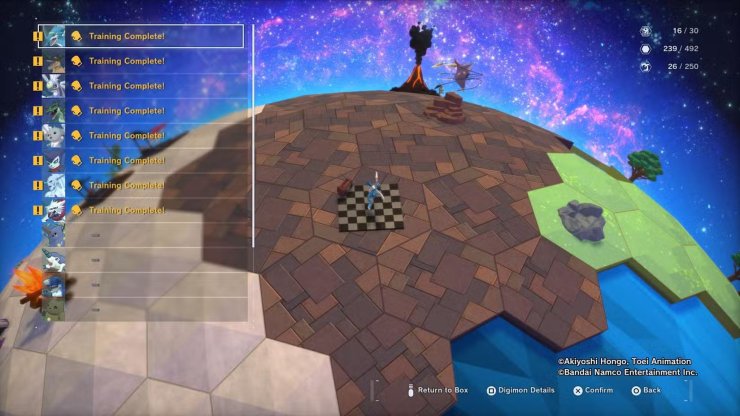
You have to check in on the farm regularly, but you can't pop in anytime. Access comes through the In-Between Theater by chatting with Mirei Mikagura. Most maps have at least one door leading there, but you'll always have to pause your current adventure to head over. When you arrive, a list of materials the Digimon have gathered shows up on the right side of the screen.
Inside the farm, pick “Interact with Digimon in Farm” to start training, feed them, or take some out. To add a Digimon, go with “Move Digimon.” You can tweak the farm's look by adding islands and items, but that doesn't change how effective training is.
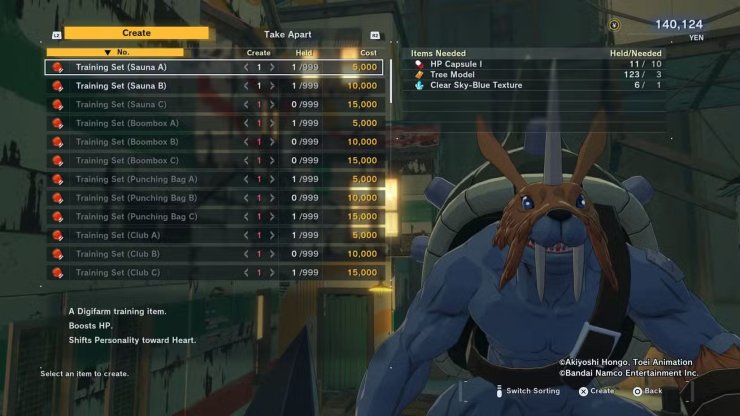
For training, choose from the available Training Sets based on the stat you want to bump or the personality shift you're after. The game has three levels of Training Sets (A, B, and C), with times of 30, 60, and 90 minutes each.
Remember, the timer runs on real-world time, but only while the game is active. We tested it, and on the PlayStation 5 version, it pauses in rest mode.
How to improve your farm in Digimon Story Time Stranger
The Digifarm is your go-to for powering up Digimon toward evolution, either by pumping stats or adjusting personalities. There aren't tons of ways to amp it up, but a few key upgrades make a difference.

Start by unlocking the “Crash Course” Agent Skills, which cut training time by 50% based on the Digimon's personality. Grab all four: “Crash Course in Valor,” “Crash Course in Philanthropy,” “Crash Course in Amicability,” and "Crash Course in Wisdom" – each handles a different set of personalities.
Once training wraps up quicker, push for more attribute points and personality gains. Craft the B and C versions of the Training Sets for that. The B ones boost both stats and personality a lot, while C versions crank stats way up without touching personality.
These advanced sets let you fine-tune for what a Digimon needs. Sometimes you skip personality changes, making Training Set C ideal.
Head to Zudomon in Central Town (or Rebellion Village later) to craft them. From what we saw, B and C sets unlocked after finishing “The Blacksmith’s Request” and “The Craftsman’s Partner” side missions. They weren't direct quest rewards, so other steps might've been done by then too.
Most materials are in the In-Between Theater shop. Craft specifics with Zudomon. After the main quest “On My Life,” talk to Wendigomon in Central Town for more material crafting.
Here's every Training Set, grouped by stat, with the personalities they target, required materials, and costs.
Training sets - HP
| Name | Stat | Personality | Materials | Cost |
|---|---|---|---|---|
| Sauna A | HP | Heart | 10 HP Capsule I, 3 Tree Models, 1 Clear Sky-Blue Texture | 5,000 Yen |
| Sauna B | HP (Greatly) | Heart (Greatly) | 1 Training Set (Sauna A), 1 Bonefire, 3 Clear Sky-Blue Textures | 10,000 Yen |
| Sauna C | HP (Vastly) | None | 5 HP Capsule III, 1 HP Attachment II | 15,000 Yen |
Training sets - SP
| Name | Stat | Personality | Materials | Cost |
|---|---|---|---|---|
| Boombox A | SP | Understanding | 10 SP Capsule I, 3 Fluid Animation Data, 1 Iron Texture | 5,000 Yen |
| Boombox B | SP (Greatly) | Understanding (Greatly) | 1 Training Set (Boombox A), 1 Generator, 3 Iron Textures | 10,000 Yen |
| Boombox C | SP (Vastly) | None | 5 SP Capsule III, 1 SP Attachment II | 15,000 Yen |
Training sets - ATK
| Name | Stat | Personality | Materials | Cost |
|---|---|---|---|---|
| Punching Bag A | ATK | Heart and Affection | 5 ATK boosts, 3 Rock Metal Fragments, 1 Arched Model | 5,000 Yen |
| Punching Bag B | ATK (Greatly) | Heart and Affection (Greatly) | 1 Training Set (Punching Bag A), 1 Snowman, 3 Arched Models | 10,000 Yen |
| Punching Bag C | ATK (Vastly) | None | 5 ATK boosts, 1 ATK Attachment II | 15,000 Yen |
Training sets - DEF
| Name | Stat | Personality | Materials | Cost |
|---|---|---|---|---|
| Club A | DEF | Heart and Companionship | 5 DEF boosts, 3 Tree Model, 1 Blackish Texture | 5,000 Yen |
| Club B | DEF (Greatly) | Heart and Companionship (Greatly) | 1 Training Set (Club A), 1 Robot, 3 Leaf Models | 10,000 Yen |
| Club C | DEF (Vastly) | None | 5 DEF boosts, 1 DEF Attachment II | 15,000 Yen |
Training sets - INT
| Name | Stat | Personality | Materials | Cost |
|---|---|---|---|---|
| Classroom A | INT | Understanding and Companionship | 5 INT boosts, 3 Gray Textures, 1 Mineral Texture | 5,000 Yen |
| Classroom B | INT (Greatly) | Understanding and Companionship (Greatly) | 1 Training Set (Classroom A), 1 Bench, 3 Mineral Textures | 10,000 Yen |
| Classroom C | INT (Vastly) | None | 5 INT boosts, 1 INT Attachment II | 15,000 Yen |
Training sets - SPI
| Name | Stat | Personality | Materials | Cost |
|---|---|---|---|---|
| Tearoom A | SPI | Understanding and Affection | 5 SPI boosts, 3 Fluid Animation Data, 1 Leaf Model | 5,000 Yen |
| Tearoom B | SPI (Greatly) | Understanding and Affection (Greatly) | 1 Training Set (Tearoom A), 1 Reservoir, 3 Blackish Textures | 10,000 Yen |
| Tearoom C | SPI (Vastly) | None | 5 SPI boost, 1 SPI Attachment II | 15,000 Yen |
Training sets - SPD
| Name | Stat | Personality | Materials | Cost |
|---|---|---|---|---|
| Treadmill A | SPD | Heart and Companionship | 5 SPD boosts, 3 Rusty Iron Textures, 1 Mineral Texture | 5,000 Yen |
| Treadmill B | SPD (Greatly) | Heart and Companionship (Greatly) | 1 Training Set (Treadmill A), 1 Merry-Go-Round, 3 Iron Textures | 10,000 Yen |
| Treadmill C | SPD (Vastly) | None | 5 SPD boosts, 1 SPD Attachment II | 15,000 Yen |


Comments