Mona is a powerful Hydro-based character in Genshin Impact, and she can be built in a variety of ways to suit different playstyles. She's best used as a support or sub-DPS character, as she can deal damage while also providing utility to the team.
In this article, Gurugamer is going to showcase a complete Mona build guide updated for version 3.6.
1. Mona Abilities and Talent Priority
Talent priority
Support: Burst > Skill > Normal Attack
Mona's Burst ability gives a temporary but powerful damage boost through the Omen buff, which can greatly benefit certain team compositions. Additionally, Mona has the ability to draw enemies towards her using her Skill and to enhance the abilities of a teammate by holding TTDS.
DPS: Burst ≥ Normal Attack > Skill
Mona's Normal Attacks can also apply Hydro and trigger various elemental reactions like Vaporize, Freeze, and Electro-Charged. Finally, Mona's Burst can act as a potent attack to start off a rotation, while simultaneously increasing the damage output of her allies.
Normal Attack
Although Mona's Normal Attacks don't have high multipliers, they can trigger reactions like Vaporize or Freeze, which her Skill and Burst aren't optimized for. They follow standard ICD and have a small AoE, which works well with grouping units. However, the third attack in the string can cause DPS loss. Mona's Charged Attack deals decent damage and has no ICD, making her useful in Vaporize teams. Canceling the attack can help mitigate Stamina issues; jumping canceling is recommended over dash canceling due to the long animation.
Elemental Skill
Mona's Tap Skill creates a Phantom that snapshots her current stats, taunts enemies, and deals periodic Hydro DMG with standard ICD. It lasts for 5 seconds and applies two instances of Hydro. The initial cast doesn't apply Hydro and is followed by four ticks of damage and a final explosion. Mona's Hold Skill teleports her backward and replaces her location with a Phantom that provides i-frames. Her Skill generates Energy particles only if the final explosion hits an enemy, which is inconsistent. There is a bug where Energy particles can generate on cast, but it shouldn't be relied on when playing her.
Elemental Burst
Mona's Burst has complex mechanics. When cast, it applies the Illusory Bubble status, which immobilizes smaller enemies and applies Hydro, and the Omen status, which increases Omen DMG% based on Burst Talent level. Damage to enemies under the Illusory Bubble pops it and deals a large instance of damage, affected by the Omen DMG% buff. Leveling Mona's Burst to at least Level 7 is recommended for the maximum 5-second duration of Omen. The Omen DMG% buff increases with Burst Talent level. Properly Vaporizing her Burst and extending the Omen's duration are essential to understand its intricacies.

Constellation
Mona's fourth Constellation (C4) is her best, providing a strong CRIT Rate buff for her own damage when enemies have the Omen status. The buff applies to her Illusory Bubble pop. In Freeze teams that can extend the Omen buff duration, this Constellation enables the team to build for other offensive stats.
Combos
| N2C(J) | Mona's most optimal combo as an on-field DPS is to cancel her third Normal Attack with a Charged Attack. Although it's not necessary, jump canceling her Charged Attack is highly suggested to maximize her DPS. |
| E Q | The typical combo is to use Mona's Skill followed by her Burst, which cancels the Skill's ending animation. It's almost impossible to pre-generate particles for Mona's Burst because of her particle generation mechanism. However, you can try to activate Favonius with her Skill while she's in her Burst animation as a close alternative. |
| Q E | Using Mona’s Skill after her Burst improves her Hydro application. Recommended for Freeze teams. |
2. Mona Weapons and Artifacts
Artifact stats
For Mona, Energy Recharge (ER) is the most important stat to prioritize as her Burst provides the most significant contribution to both her personal and team's damage. To meet her high ER needs, it's recommended to use an ER Sands. Only when her ER requirements are fulfilled, an ATK% Sands can be considered as a viable option.
Substats: ER (until requirements) > CRIT Rate = CRIT DMG > ATK%
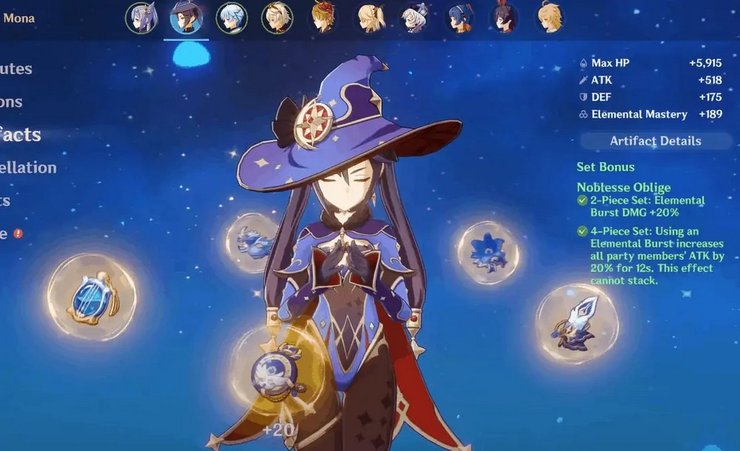
Artifact sets
| Artifact Set | Description |
| 4pc Noblesse Oblige (4NO) | One of Mona's best support sets is 4NO, as she uses her Burst almost every rotation, and it grants a useful teamwide ATK% buff that benefits her Burst's damage as well. |
| 4pc Tenacity of the Millelith (4TotM) | The 4TotM set bonus is triggered by Mona’s Skill per tick of damage, not on cast. Since the Skill’s duration is short, the ATK% buff uptime is not ideal. Nonetheless, other units can still snapshot the buff, making it a viable option especially if there is another unit on the team equipped with 4NO. |
| 4pc Emblem of Severed Fate (4EoSF) | Mona's ER needs are usually high as a support, and 4EoSF set can be a good choice for her. However, this set is not supportive and encourages building more damage-oriented stats, so it's not typically recommended to farm for. |
| Mixed 2pc sets (ER, Burst DMG%, ATK%, Hydro DMG%) | Less support-oriented compared to 4NO and 4TotM and generally has a lower damage output compared to 4EoSF. However, mixed 2pc sets can be a temporary option if still farming for a good 4pc set. |
| 4pc Gilded Dreams | A competitive option for Mona’s Vaporize teams due to the EM and ATK% it supplies. |
| 4pc Wanderer’s Troupe (4WT) | The 2pc EM set bonus is nice for Vaporize teams since, ideally, Mona is able to Vaporize most, if not all, of her Charged Attacks. This set does not buff Mona’s Burst. |
| 4pc Heart of Depth (4HoD) | The 4HoD set effect lasts for 15 seconds and Mona’s Skill has a 12-second cooldown, so she is able to maintain 100% uptime. This set does not buff Mona’s Burst and works best in Electro-Charged teams. |
Weapons
| Weapon | Description |
| Lost Prayer to the Sacred Winds, Kagura’s Verity | Lost Prayer and Kagura's are CRIT weapons that have passives which provide Elemental DMG% conditionally. Lost Prayer requires staying on-field for at least 4 seconds while Kagura's requires using Mona's Skill three times. While Lost Prayer is generally better for DPS Mona, both weapons are viable and have similar performance. |
| A Thousand Floating Dreams | A good option, but only for Vaporize teams. Gives a chunk of EM to Mona while sharing EM and Elemental DMG% to the rest of the team. |
| Favonius Codex | With an ER secondary stat and a passive that generates Energy particles, this weapon is one of the best options to help meet Mona’s ER requirements. |
| Prototype Amber | A craftable Catalyst that noticeably lacks offensive stats but refunds Flat Energy with its passive, drastically lowering Mona’s ER requirements. In teams that can scrape by without a healer, most notably Freeze teams, the healing from Prototype Amber can be a welcome addition. |
| Memory of Dust | Can be comparable to Lost Prayer and Kagura’s, especially when Mona is paired with a shield unit. Note that building enough CRIT from artifacts alone may be difficult. |
| The Widsith | One of Mona’s best 4* options and competitive with 5* options. It has a CRIT DMG stat, and its passive randomly provides either ATK%, Elemental DMG%, or EM for 10s. The EM buff is not as useful outside of Vaporize teams. Its passive also has a lengthy 20-second downtime. |
| Skyward Atlas | Skyward Atlas can provide the highest damage potential, but with some challenges. First, it does not supply any CRIT, which can be difficult to build around. Second, the orb generated from its passive can prematurely pop Mona’s Illusory Bubble, resulting in disrupted rotations and a DPS loss. Some workarounds include not using Normal Attacks (e.g. using Charged Attacks instead) or utilizing the passive’s 15-second downtime. |
| Tulaytullah’s Remembrance, Blackcliff Agate | Tulaytullah’s passive does not buff Charged Attack nor Burst damage, while Blackcliff’s passive requires defeating an opponent (which can be unreliable in, for example, Abyss content). These two are essentially CRIT DMG stat sticks. |
3. Mona team comps
Freeze
Mona's Freeze compositions usually include a Cryo DPS on the field, a Cryo battery, and an Anemo character for VV Shred and crowd control.

Mona is frequently paired with the potent Cryo DPS characters Ganyu and Ayaka. These two can snapshot buffs from TTDS, 4NO, and 4TotM, and can fully utilize the Omen extension mechanic in a Freeze-based team. Venti, Kazuha, and Sucrose are useful in holding 4VV to reduce enemy resistance and provide grouping in a team. Venti can refund energy quickly, Kazuha provides elemental damage, and Sucrose can hold TTDS.
On-Field Vaporize
Mastering the technique of properly vaporizing Mona’s Burst and Charged Attacks can be technically difficult, but it will result in the maximum possible damage output for Mona herself.
Xiangling is essential for applying Pyro consistently to trigger Vaporize with Mona's attacks. Bennett is also useful because he can provide a powerful ATK buff that can be snapshot and can charge Xiangling's energy. Kazuha and Sucrose are capable of using the 4VV artifact set for Elemental RES Shred. Kazuha has an A4 passive that provides an Elemental DMG% buff, while Sucrose can use TTDS to share EM.
Quickswap Electro-Charged
An Anemo unit holding 4VV can Swirl and reduce enemy RES to both Electro and Hydro, which is possible due to good Electro-Charged uptime. However, the short duration of Mona's Omen is not fully utilized in Electro-Charged teams, although she can still be a suitable choice. Her role in this team is usually a combination of support and DPS.
The fourth slot in this team is versatile and can be filled by a driver, a healer, a shielder, another Hydro unit, another Electro unit, and/or another Anemo unit.
Fischl and Yae are strong options for dealing with off-field Electro damage, with a focus on single-target attacks. This isn't usually an issue since they're typically paired with Beidou and/or an Anemo unit for Swirl effects. Beidou works best in scenarios where there are multiple targets to take advantage of her powerful Burst and synergizes well with Fischl.
Venti, Kazuha, Sucrose, and Heizou are all options for providing grouping, VV Shred, and damage through Swirls. Venti can refund Flat Energy, Kazuha provides an Elemental DMG% buff, and Sucrose and Heizou are both able to hold TTDS and share EM. However, Heizou tends to prioritize personal damage over supportive abilities.
>>> Read more: Top 5 Best Team Comps For Mika In Genshin Impact 3.6


Comments