Honkai: Star Rail is an RPG that follows a turn-based gameplay model and bears a strong resemblance to classic JRPGs, particularly the Final Fantasy series. The game comprises two distinct modes: overworld and battle. In the overworld mode, you navigate the map, and when you come across an enemy group, you will switch to the battle mode, where you must engage in turn-based combat to emerge victorious.
In this article, Gurugamer is going to showcase what to do in Star Rail right after the game start in order to be the most efficient as possible.
What to do after tutorial?
The tutorial in Honkai: Star Rail takes approximately 30-60 minutes to complete, and it does a decent job of familiarizing you with the basic mechanics of the game. However, after unlocking Warping and performing your initial pulls, the game becomes more open-ended, allowing you to pursue your own interests.
Nevertheless, before embarking on a quest to explore Herta Station and uncover all the chests and lore items, we advise that you concentrate on completing the Main Story quests. Why? Because even though you have finished the tutorial, there are numerous other features that remain locked behind the main storyline, such as Daily Missions, Leveling Rewards, Trailblaze Power (stamina), and so on.
Missions
Upon opening your Mission log in Honkai: Star Rail, you will be presented with an array of mission types to undertake, as follows:
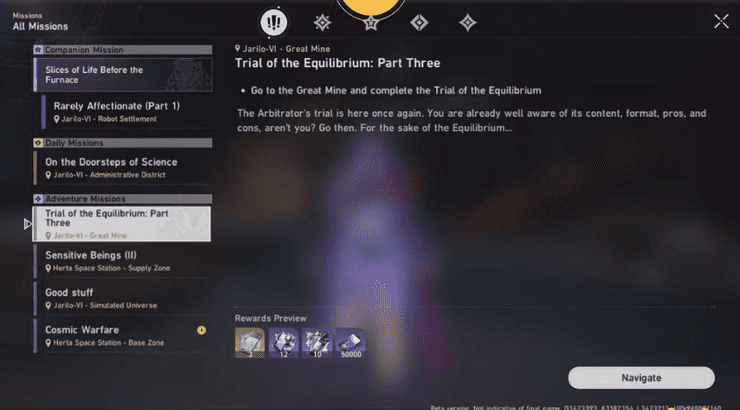
- Trailblaze Missions (gold color): These missions are essential for advancing the storyline, and you should prioritize them if one is available. As depicted in the image above, your progress through the main story may be impeded by your Trailblaze Level. At this juncture, you should engage in other missions to earn experience and level up.
- Companion Missions (purple color): These missions delve into the histories of certain characters who have joined your team. While they are not as lengthy as Trailblaze missions, they are more story-driven and will take up a considerable amount of your time.
- Adventure Missions (blue color): These are your typical side-quests that are brief but provide you with experience and some rewards.
- Daily Missions (green color): While not displayed in the above image, these missions are even shorter than Adventure missions and are randomized daily.
Next steps
Having acquainted yourself with the different types of missions, it's time to refocus on the Main Story!
The upcoming Trailblazer Mission will introduce Herta and the Simulated Universe. The Simulated Universe is a game mode that follows the roguelike format, in which the player must pick a team of four characters and enter a simulated world to acquire a randomized set of power-ups that can be utilized to bolster their team's abilities when fighting against foes within the simulation.
Make your way to Herta's office and complete the trial run of the Simulated Universe. This will grant you access to Herta, but she is not particularly powerful, so it's best to keep her on the bench. Although you could undertake another Simulated Universe run immediately, it's better to hold off for now and return to the Main Story.
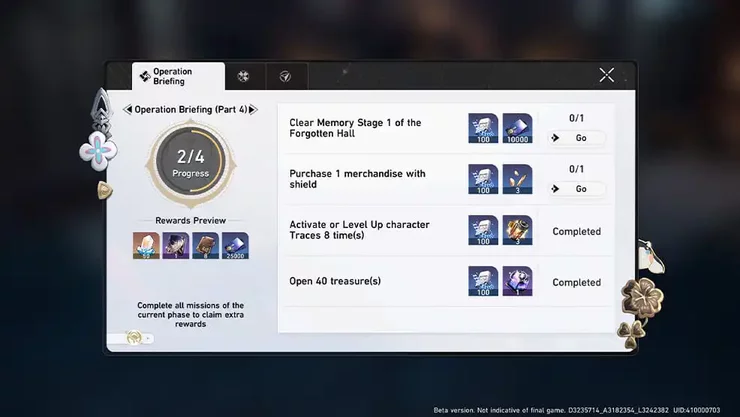
Before long, you will depart from Herta Station and embark on a journey to the Astral Express. There, you will gain access to two new systems: Operation Briefing and Trailblaze Level Rewards.
Operation Briefing is a collection of missions that bestow various rewards upon completion. In total, there are nine pages, each containing its own set of missions and primary rewards. Here's an example of what it looks like:
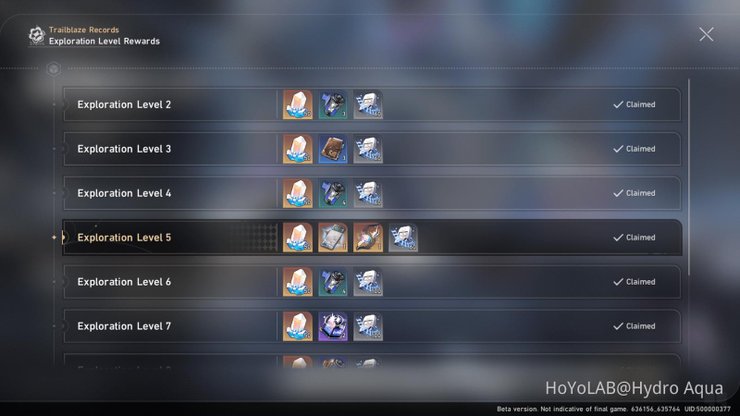
At the same time, you will also gain access to Trailblaze Level Rewards. Moving forward, every time you increase your level, you can return to Pom-Pom to claim some complimentary items:
Following that, some story events will take place and you will eventually find yourself on a new planet, where you will be freezing cold. Luckily, before long, you will encounter your initial Calyx and gain access to your Trailblaze Power, which is essentially the equivalent of stamina in Honkai: Star Rail.
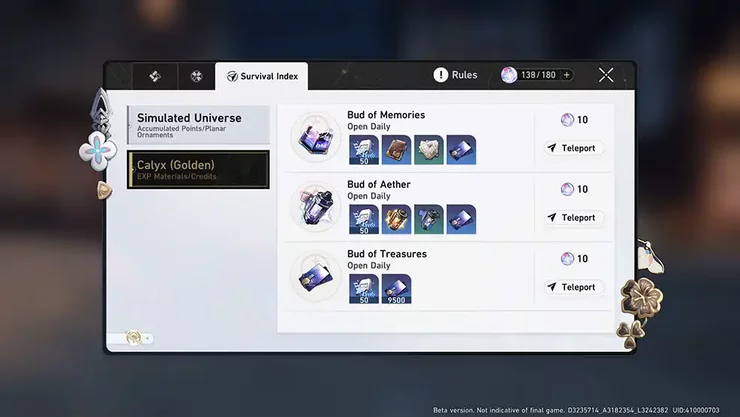
There are multiple sorts of Calyx, but initially, you will only have access to the Bud of Memories Calyx, which provides Character EXP Materials. As your Trailblaze Power will be limited to 180/180, run a few sessions in the Calyx to restart its regeneration, and utilize the materials you've received to enhance your primary team.
At this point, you have gained entry to the majority of the systems, enabling you to go back to the Herta Station and commence completing side-missions or continue with the Main Story on Jarilo-VI. Enjoy yourself!
Tips and tricks for progression
Here is a list of tips and tricks to help you progress smoothly in the early game:
General
- Prioritize the Main Story before exploring the world. Only venture out to level up when necessary to unlock the next Main Story mission.
- Level up your characters to the current level cap as the difference in levels between you and your enemies affects the damage you deal.
- Equip Light Cones that match your character's Path to receive passive bonuses in addition to basic stats.
- Level up your Light Cones to the available level cap.
- Don't spread your resources too thin. Initially, your resources are limited, so focus on farming the EXP Calyx for character EXP materials.
- Only upgrade the Traces of characters you plan to use in the long run.
- Check the Tier List guide for the best early-game characters that are a safe investment.
- Don't let your Trailblaze Power (stamina) exceed 180 TP, which is the maximum you can store. You regenerate 240 TP daily at a rate of 1 per 6 minutes.
- Wait until the last day before reset to do your 3 weekly Echo of War runs for better rewards.
- Reach level 40 cap in the first week to unlock higher difficulty EoW and earn better rewards.
- Complete enough runs in Simulated Universe to unlock all the weekly rewards.
- Remember to check the Region Shops for important materials and Eidolons for the Main Character.
- Obtain the currency for the Region Shop by completing missions in the zone where the shop is located.
- Always send out your characters on Assignments to gain free materials. You can still use them in combat while they're on Assignments.
- Complete Battle Pass Daily and Weekly missions to earn decent free path rewards.
- Explore the world thoroughly to find hidden Treasures, enemies, puzzles, and quests for experience, Stellar Jades, Relics, and various materials.
- If you're stuck on a difficult fight, borrow a character from a Friend.
- Complete Trial of the Equilibrium missions to increase your Equilibrium Level.
- At levels 20, 30, 40, 50, 60, and 65, you will unlock a mission to upgrade your world level and level up your characters past the current cap.
- Don't rush the Equilibrium upgrade Missions if you don't have enough EXP and Ascension materials saved as monsters will become harder to defeat in the new world tier.
Combat
- Break Effect is the most important thing to focus on in combat. By investing in this one stat, you can easily deal massive damage to the enemy's HP bar once their Toughness Bar is broken. In the early and mid game, it's better to prioritize Break Effect over Crit since it only requires one stat investment instead of three.
- Build a balanced team with skill point spenders and generators. Having a team with only damage dealers can lead to poor damage output due to competition for Skill Points. Generators, typically supports, don't need to use their Skills every turn, which allows your spenders to use their Skills more frequently.
- Make sure to match your damage dealers to the enemy's weakness, especially bosses. Breaking the Toughness Bar takes a long time without matching elements.
- Consider using a more defensive team in the early game, as some bosses have tough mechanics that can chip away at your team's health. Running a healer/shielder combo is a safe option. In Simulated Universe, running a defensive team is necessary if you don't want to waste time.
- Don't hesitate to use Technique Points, as there are items that can restore them scattered throughout the game. Match your character's element to the enemy's weakness when using a Technique.
- If a Technique gives a buff, you can stack them, but offensive Techniques should be used after stacking the buff Techniques. This is especially useful before difficult fights in Forgotten Hall and Simulated World.
Relics
It's not necessary to upgrade every single Relic piece you come across because the materials required for upgrades are scarce. If you use them all up, you will need to obtain more Relics to feed into the ones you want to upgrade. This leads to the next point... In the early game, it's not wise to spend your stamina on farming Relics. Further details on Stamina usage are provided in the section below.
Warps
Avoid using Stellar Jades to pull on the General Warp. Instead, reserve the Basic Passes that you receive from rewards and missions for that banner. Save your Stellar Jades for rate-up banners or for stamina refreshes.
Stamina usage
In the first couple of weeks, it's best to prioritize three things when using your Stamina:
First, focus on farming Golden Calyx: Bud of Memories and Golden Calyx: Bud of Aether to acquire Character and Light Cone EXP Materials. Second, farm Crimson Calyx to acquire materials necessary to level up your Traces to improve your skills and passives. Lastly, farm Stagnant Shadow to acquire materials necessary to ascend your characters. Ascension materials are required every 10 levels starting from level 20, so you'll need plenty of them.
However, it's recommended to only farm Golden Calyx when you need EXP Materials. If your team and their Cones are already at the current level cap, then ignore the Calyx until you increase it again. This means that you should focus more on Traces and Ascension materials.
It's not advisable to spend your Stamina on farming Relics in the early game. Initially, in the Cavern of Corrosion, you'll only be able to farm 3★ Relics with a chance to get 4★ Relics. It's only when you reach Difficulty 3 of the Caverns that you have a chance to drop 5★ Relics, which only goes up to 100% drop on Difficulty 4. It may take a few weeks of playing to reach that point.
While farming in the Simulated Universe early on isn't that bad, it's recommended to focus on 2★ Relics and 3★ Relics, as they can give you a significant boost. Simulated Universe is the source of the Planetary Relic Sets that only have 2-piece bonuses. Once you've obtained the sets you wanted or the Main Stat you need, wait until you reach higher World levels in the Simulated Universe to obtain higher Relic rarities.
How to level up quickly?
Are you struggling to increase your Traiblaze Level and the next Main Story mission seems a bit far off? Check out the various sources of EXP available in Honkai: Star Rail below.
- Firstly, complete the Daily Training which can reward you with up to 1000 EXP per day for completing all the missions. Secondly, Adventure and Companion missions are great additional sources of experience with rewards ranging from 100 to 400 EXP per mission.
- Another way to gain EXP is by spending Traiblaze Power. Whatever activity you choose to spend your TP on will provide a set amount of experience. Operation Briefing missions are also a great way to earn EXP.
- Finally, exploring the Open World can yield treasures, monsters, and random encounters that grant additional experience. While treasures can only be opened once, the monsters respawn daily, allowing you to roam around the maps after completing other tasks for the day and gain additional experience, as well as Ascension materials.
>>> Read more: How To Reroll In Honkai Star Rail


Comments